
-
Professional Knocking + Extra Grip
Save 0%Regular price $60.00Regular priceUnit price per -
Knocking Service with NEW Toe Guard Applied
Save 0%Regular price $89.99Regular priceUnit price per -
New Toe Guard - Need to Add in Bat
Save 0%Regular price $34.99Regular priceUnit price per$34.99Sale price $34.99 -
Knocking in, send us your NEW bat
Save 0%Regular price $60.00Regular priceUnit price per$60.00Sale price $60.00 -
Cricket Bat Repairs, Refurb & Weight Reductions
Save 0%Regular price $60.00Regular priceUnit price per


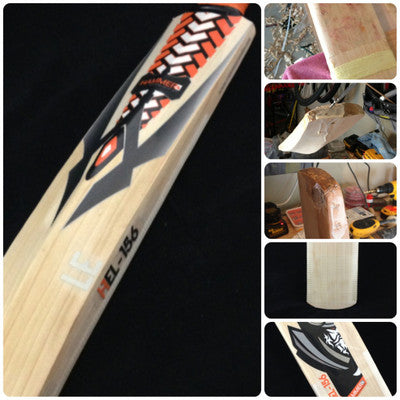
At Cricketstoreonline, we provide all kinds of repairs, all done by our experienced staff. Our workshop is equipped with state of the art machines that get your bats ready in a short time.
The Process
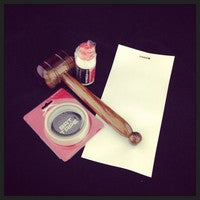
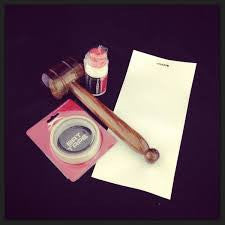
Knocking
During manufacture, every bat is usually heavily pressed so that they have a good ping. Bat knocking is required to soften the fiber on the bat’s willow face. Not only does bat knocking improve the ping, but it also reduces vibration, which improves your game.
Oiling
We will prepare your new bat so that it’s ready to play in your next game. Our team of professionals will prepare the bats to ensure that they are in perfect working condition. In addition to knocking, we also provide oiling and protection, which reduces the chances the bat cracking by 90%.
Modern cricket bats are very dry, which makes them thick and light. Dry bats, however, have their downsides. Dry bats start chipping and cracking on the face and toe, making them susceptible to breaking. Also, some people leave bats in conditions that make them dry out such as in their cars. Too much heat dries out the moisture from the bats.
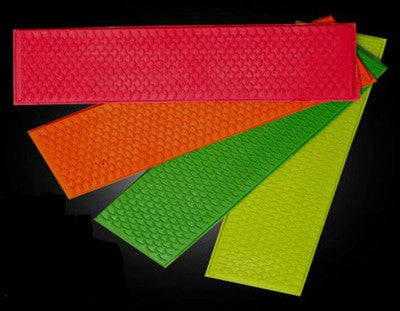
Protection
We can also add an extratec protection sheet to the bat’s face to protect it from marks caused by hitting the ball and water damage. The protection sheet also seals in the bat’s natural moisture.
Toe Protection
Shielding the bat’s toe is a critical part of protecting it. Toe protection is important because it protects the bat against excessive vibration when hitting and against water damage.
Summary
All bats purchased at Cricketstoreonline are recommended to opt for Professional knocking (extra cost).
We will complete the job in around 3-5 days.
We will remove the bat’s sticker when necessary.
At an extra cost, we may remove the bat face sheet.
We will sand and buff the bat’s face to bring back its shine and natural wood color.
We will add a new face sheet and toe tape
We will apply bee-wax to the bat’s back to give it a protective coat that shines and protects it from excess moisture.
Fastest Delivery and Easy Return Policy
We have a strong logistic support system that helps us in delivering the products at the right place within the given time. In addition, we make sure that the clients have the opportunity to refund without hassle.
We are aware that when you think about return policies, paranoia sets in. With us, though, things couldn’t be simpler. Our aim is to make everything as seamless and effortless as a perfect cover-drive would look.
If you are looking for a cricket helmet, we have it ready for you. We guarantee that you are going to get the supreme quality bats and cricket accessories at competitive prices that you’d be hard-pressed to find anywhere else. Shop today and take your game to another level.
FAQs
How long does it take to properly knock in a new cricket bat before match use?
Proper knocking-in is a vital process of compressing the willow fibers to prevent damage and maximize performance.
-
Adult Bats (Full Size): Requires 4 to 6 hours of dedicated striking time using a wooden bat mallet. This should be spread out over a period of 2 to 3 weeks in 30-minute sessions.
-
Junior Bats: Typically require less time, around 2 to 3 hours of striking, due to less willow mass and softer ball impact in junior cricket.
-
Pre-Prepared Bats ("Ready Play"): Even if a bat is machine-pressed, you should still perform an additional 1 to 2 hours of careful hand-knocking, paying close attention to the vulnerable edges and toe.
The bat is fully ready when you hit an old, quality leather ball in the nets and it leaves no visible seam marks or indentations on the bat face.
Should I oil my English Willow bat before or after the knocking-in process?
You must oil your English Willow bat first before beginning the knocking-in process.
-
Purpose of Oiling: Applying raw linseed oil moisturizes the willow, preventing it from drying out and becoming brittle. This moisture allows the fibers to compress and toughen (knocking-in) instead of cracking upon impact.
-
Process: Apply 1-2 light coats of raw linseed oil to the face, edges, and toe, letting each coat dry for 24 hours while the bat rests horizontally, face-up. Avoid over-oiling, and do not oil the handle or the splice (the triangular area where the handle meets the blade).
-
Note on Scuff Sheets: If you plan to apply an anti-scuff sheet (Extra-Tec), only one light coat of oil on the face is necessary before application.
What types of cricket bat damage require professional repair vs. a DIY fix?
Knowing when to seek an expert protects your investment and ensures a safe, prolonged bat life.
| Damage Type | Recommended Fix | When to Call a Professional |
|---|---|---|
| Minor Surface Cracks (Hairline, on face/edge, <1-2 inches) | DIY Fix: Apply thin superglue (cyanoacrylate) into the crack, wipe excess, and clamp or tape tightly until dry. | If the crack begins to run deeper or widens significantly after a DIY attempt. |
| Split Toe or Deep Edge Cracks (>2 inches) | Professional Repair: Requires specialized wood glue (PVA), clamping/binding, and potential fiber-glass reinforcement. | Always send the bat for professional repair as the integrity of the hitting area is compromised. |
| Broken/Loose Handle | Professional Repair: Requires the handle to be removed, cleaned, re-glued with epoxy/rubber cement, and re-whipped/bound. | Always replace the handle professionally; an unstable handle is dangerous and makes the bat unusable. |
Can I fix a cracked cricket bat edge or toe at home, and what materials do I need?
You can successfully repair minor edge or toe cracks at home using basic materials, but major splits should go to a professional.
-
Clean: Gently clean the crack to remove dirt and dust.
-
Glue: Work a small amount of wood glue (PVA) or superglue deep into the crack. Use a syringe or fine implement to ensure full penetration.
-
Clamp/Cure: For a crack on the face or edge, clamp the bat gently between two pieces of wood or use strong elastic bands/tape to hold the crack together for 24 hours while the glue dries. For a minor toe crack, simply bind it tightly.
-
Finish: Once dry, lightly sand the repaired area and apply a small amount of raw linseed oil to the exposed wood. Reinforce the edge with fiber tape or twine if desired.